How to install and configure SSH server on RHEL 7

How to install and configure SSH server on RHEL 7


Install SSH server

To commence you must install the SSH server (and client). There are many servers that you can choose from, but today we’re going to install OpenSSH, probably the most popular one.
If everything goes well, you will have a SSH server installed and a key for the host configured. Next thing is to enable and start the service using systemd. And next is opening the appropriate firewall port. I assume you’re using firewalld instead of iptables.
This ensures the SSH server is loaded and started at boot time, and start it right now. Ok, end of the story. It can indeed work like this, but you should also take a few minutes to configure your new SSH server. First you should familiarize with the configuration folder: /etc/ssh . You will find a few files inside this folder, the configuration of the server resides however in the sshd_config file.

Configuring SSH server

There are many many configuration options, we’ll cover the most important ones.
This is by no mean a complete list, but shows you the most used (and important) options. If you’re willing here’s the complete list. Be sure to reload sshd for the changes to take effect
Also, changing the port or the address will require a restart of the SSH server.


Ransomware:
 How we can climb out of this mess

Ransomware:
 How we can climb out of this mess


Computer malware seriously disrupted the continuity of clinical operations when WannaCry struck. The Department of Homeland Security began issuing warnings of ransomware vulnerabilities affecting dozens of medical products ranging from radiation oncology and mobile x­rays to ultrasound and anesthesia. Saved by a curious 22­year­old who spent $11 to register a domain name that accidentally disabled the spread of the buggy malware (not a joke), the world can rest briefly until the next attack — which could happen again without warning.
Ransomware itself is not the cause of our problems. Ransomware is symptomatic of design flaws baked into the fabric of our healthcare infrastructure. The root cause is a fragile infrastructure filled with legacy medical device software.
When we know about a disease, do we read about it and hope never to get it? No, we vaccinate, avoid risky areas, wash our hands, and seek immediate help after coming in contact with a carrier. In short, we plan ahead for risk management.
So, what's an effective strategy to mitigate the medical device security risks that can disrupt clinical operations?
Simply deploying new technology is not the answer. Replacing old unmaintainable computers with new unmaintainable computers is not the answer either. An effective approach must address five core parts of the healthcare delivery supply chain: manufacturing, procurement, regulation, training and governance.
First, medical device manufacturers must design medical devices to remain safe and effective despite cybersecurity risks. The U.S. Food and Drug Administration already recognizes community standards and best practices such as the AAMI TIR57 for building security into the design of medical devices. Microsoft warned manufacturers from day one of the scheduled obsolescence of Windows XP. The operating system “end of road” hazard signs were unambiguous and forewarned years before reaching the cliff. While manufacturers may have sold the unmaintainable products, hospitals made the mistake of buying them. Hospitals accumulate legacy devices for decades without a financial model to sunset unsecurable products.
With procurement practices such as the cybersecurity “vendor book” from the Mayo Clinic, hospitals should factor meaningful cybersecurity into purchasing decisions. Medical devices should come with a bill of software materials to enable risk­based purchasing decisions. Hospitals need to buy and maintain better equipment with better service contracts — and they need to keep track of their inventory down to the port numbers, ethernet MAC addresses, and software versions so they can better manage risk. Manufacturers should give providers a database that maps medical device serial numbers to MAC addresses to make network-based inventory tracking feasible.
Governments should consider construction of a test hospital for national cyber crashworthiness trials of healthcare infrastructure. The automotive manufacturing community performs crashworthiness testing so consumers can know the risk. Although patients prescribed a medical device are far safer with the device than without, patients and hospitals deserve to know what risks they are accepting when receiving or purchasing a medical device.
Regulators must take into account the geographic problem that malware does not respect international boundaries. The same core cybersecurity problems exist everywhere, and healthcare IT cultures in different countries suffer from surprisingly similar computing problems. Medical device regulators such as FDA, MHRA in the UK, and CFDA in China need informed authority and legislative remit to ensure that medical devices remain safe and effective despite cybersecurity threats.
Who is liable for problems? Who feels any economic incentive to fix things? Unfortunately, not the entities with the most capability to address the causes, as the recent ransomware fiasco illustrates. Governments could mandate a phasing out of unsecurable devices and operating systems with penalties assessed by the HHS Office for Civil Rights, for the case of the U.S.
Fighting international criminals with considerable economic incentive will remain a continually losing battle without a coherent and fair regulatory strategy. For instance, the Criminal Justice Act in the UK assumes that information technology makes no security mistakes. Such poorly designed laws open the door to misguided prosecution of well­intentioned doctors and nurses for shortcomings in the medical systems and devices themselves. Legislation ought to incentivize cybersecurity and safety for manufacturing medical devices rather than penalize innocent healthcare delivery professionals and patients who make fair and reasonable attempts to report problems to manufacturers or regulators.
Workforce shortfalls remain a great barrier to cybersecurity. Few of our computer science students choose to work in healthcare. We need to focus attention on the great opportunity for computer science students to help improve healthcare. Double major in biomedical engineering! Manufacturers and governments should offer prestigious graduate fellowships to attract the best students to the field so that manufacturers, hospitals, and regulators can fill their open cybersecurity positions.
Finally, hospitals need effective governance structure for controlling software safety risks in medical device. A hospital should designate a top­level executive with the authority, responsibility, accountability, and budget for cybersecurity in the pursuit of healthcare safety that covers both the biomedical engineering and IT departments.
No medical device is perfectly secure, but a hospital should gracefully recover from cyberattacks rather than suffer system­wide outages for days. Patients should never be forced to doubt in the availability and integrity of healthcare delivery. Security is a means to an end, and that end goal is safe and effective delivery of healthcare.
The recent global outbreak of ransomware is just the symptom du jour, and it’s time to act on recommendations to improve cybersecurity in manufacturing, procurement, regulation, training, and governance. Until cybersecurity becomes as second nature as hand washing, we should expect the cybersecurity problems to increase in frequency and consequence.
If there’s any silver lining, perhaps manufacturers, healthcare delivery organizations, and governments will begin to think more strategically rather than reactively to improving healthcare cybersecurity.
Kevin Fu, PhD, is CEO and chief scientist of healthcare cybersecurity company Virta Laboratories and directs the Archimedes Center for Medical Device Security at the University of Michigan. Harold Thimbleby, PhD, is Professor of Computer Science at Swansea University, Wales. He is an honorary Fellow of the Royal College of Physicians and analyses hospital IT problems. 

How to Install And Configure Apache In Ubuntu

How to Install And Configure Apache In Ubuntu


Getting apache onto your Ubuntu machine is easy. Using either the Synaptic Package Manager, Ubuntu SoftwareCenter, search and install the “apache2” module. Alternatively, you can open a terminal and type the following command:
sudo apt-get update
sudo apt-get install apache2
Once the installation finished, open a browser and go to the URL “http://localhost“. If you see the word “It Works!“, then your installation of apache is successful.sudo apt-get update


Start, Stop and Restart Apache
After you have installed Apache, it will be added to the init.d list and will auto start whenever you boot up your computer. The following commands allow you to start, restart, stop Apache.
sudo /etc/init.d/apache2 start   #start apache
sudo /etc/init.d/apache2 stop   #stop apache
sudo /etc/init.d/apache2 restart   #restart apache
To prevent Apache from autostart when booting up:
sudo update-rc.d -f apache2 remove
To restore Apache back to the autostart list:
sudo update-rc.d apache2 defaults
Notethe above commands will work in debian-based distro (including Ubuntu) only.
Changing the default localhost folder
By default, apache will operate on the “/var/www” folder. This means that whatever files you place in this /var/www folder will be visible from the URL http://localhost. In some instances, you may want the “localhost” to point to another folder instead, say /home/user/public_html. Here is how you do it:
First, make sure the /home/damien/public_html folder exists. Create a simple html file, name it index.html and place it in the public_html folder.
Open a terminal and type:
gksu gedit /etc/apache2/sites-enabled/000-default
Change DocumentRoot /var/www to DocumentRoot /home/user/public_html.
Change <Directory /var/www/> to <Directory /home/user/public_html/>.
Save and exit the file.
Restart the apache
sudo /etc/init.d/apache2 restart
Now, in your browser, reload the URL http://localhost. You should see the html file that you have placed in the public_html folder.

Configuring different sites
The above trick allows you to change the default operating folder of apache, however, some of you might not want to override the default settings. An alternative is to create multiple sites and point apache to the active site.
Create a new settings file for your new site.
sudo cp /etc/apache2/sites-available/default /etc/apache2/sites-available/site1
Next, edit this settings file.
gksu gedit /etc/apache2/sites-available/site1
Change DocumentRoot /var/www to DocumentRoot /home/user/public_html.
Change <Directory /var/www/> to <Directory /home/user/public_html/>.
Save and exit the file.
Disable the default setting and make active the site1 settings
sudo a2dissite default && sudo a2ensite site1
Lastly, restart the apache.
sudo /etc/init.d/apache2 restart
With this trick, you can create multiple site configuration file, each pointing to a different folder. You can then easily switch between the sites with the a2dissite and a2ensite command
Enabling .htaccess file
.htaccess file is a powerful file that can be used to control and customize a site server behavior without editing the core Apache module. By default, the .htaccess functionality is turned off and all instances of .htaccess files are completely ignored. The server will not even attempt to read .htaccess files in the filesystem.
To enable .htaccess file, open up the settings file that you have created earlier:
gksu gedit /etc/apache2/sites-available/site1
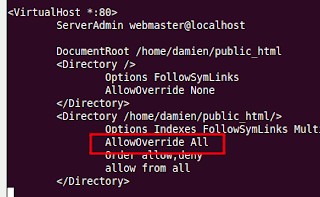
Scroll down the file until you see the part “<Directory /home/user/public_html/>“. Underneath that line of code, change AllowOverride None to AllowOverride All.


Save and exit the file.


Generating Your SSH Keys


SSH Keys are very important. Without them you won’t be able to connect to your server. To start making your keys, create the folder in which your newly-generated key will live.


mkdir ~/.ssh


After making the folder, change its permissions.


chmod 700 ~/.ssh


Finally, generate your key. Keep in mind that SSH is only as safe as the password you set up. If you enter a weak password, one that can be guessed easily, you’ll be open to attacks. Instead, try to generate a secure, memorable password.


ssh-keygen -t rsa


Connecting Over LAN


Want to connect over LAN? It’s easy! Just open a terminal window and figure out the IP address of the machine with the SSH server running. This can be done simply by running the ifconfig command.

Once you’ve determined the IP address of the machine, you’ll be able to log in. Just go back to the machine you’re trying to log in with and enter this command:

ssh username@ip.address.here


Note: change the “username” to the user name of the SSH server.


From there you’ll be prompted to enter your password. Do so. Soon after you’ll be logged in over LAN via SSH.

Along with connecting over LAN, connecting via SSH over the Internet is possible too. It just requires a bit of network savvy to set up. If you want to do this, you’ll need to set up port forwarding for your router.
Since every router out there is vastly different, you’ll need to do your own research on this topic. Just make sure you forward port 22 to the Internet from whatever machine is set up to use the SSH server, and you’ll be set.

After setting up port forwarding, you’ll need to determine the IP address of the machine you’re trying to SSH to. The easiest way to figure this out is to head over to ipchicken.com. They’ll tell you your Internet IP address.

Once you’ve gotten your Internet IP address, you’ll be able to log in. Just go to your terminal and enter the following:

ssh username@ip.address.here


From there you’ll be prompted to enter the SSH password. Enter it, and soon after you’ll be logged into your machine over the Internet via SSH.

Congratulations, you have completed setting up SSH in Ubuntu; you can now proceed to secure your SSH server.